
Cut two felt layers per shape, embroider the fronts, secure a knotted hanging loop, blanket-stitch the edges, and fill lightly before closing.
Hand-Stitched Felt Christmas Ornaments
A small set of felt Christmas ornaments is an ideal hand-sewing project because the shapes are compact, the seams remain visible, and slight differences make the collection feel made rather than manufactured. This tutorial produces three 3½-inch ornaments—a tree, a star, and a round bauble—using the same construction method and a restrained vintage palette.
Project at a glance
- Difficulty: Confident beginner
- Active time: 90–120 minutes
- Total time: 90–120 minutes
- Yield: Three ornaments, approximately 3½ inches each
- Supervision: Ages 12+; adult supervision for younger makers
Choose felt and prepare the pattern
Use wool-blend felt 1–1.5 mm thick. It holds a clean edge, accepts hand stitching, and resists the fuzzy surface that inexpensive craft felt can develop. For three ornaments, one 9-by-12-inch sheet each of evergreen, muted red, and warm ivory is ample. You will also need six-strand cotton embroidery floss, a size 5 embroidery needle, small sharp scissors, removable fabric marker, pins, polyester fiberfill, and 24 inches of narrow ribbon or cotton cord.
Draw or print a tree, five-point star, and 3½-inch circle. Keep narrow points at least ½ inch wide so they can hold stuffing. Cut each paper pattern accurately; irregularities become more obvious when two felt layers are matched.
Trace every shape twice on the back of the felt and cut just inside the marked line. Pair the fronts and backs immediately. If one piece is slightly smaller, place it on top so you can see and correct the alignment while sewing.
Add decoration before assembly
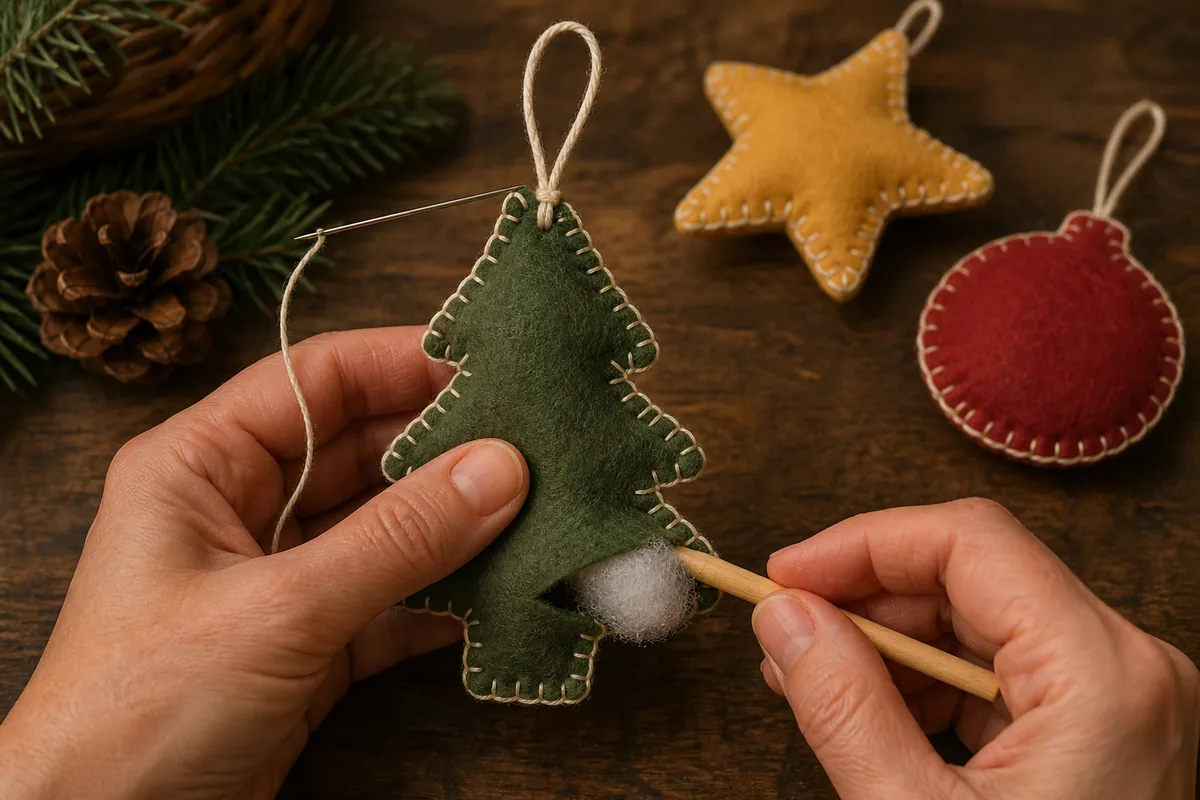
Decorate only the front layer while it lies flat. Separate the embroidery floss and use three strands for most details. On the tree, make short straight stitches for garland and small cross-stitches for ornaments. On the star, work a smaller starburst from the center. On the bauble, stitch two curved rows or a simple geometric band.
Keep embellishment stitches at least ¼ inch from the outside edge; the blanket stitching will occupy that area later. Knot the floss on the back and trim tails to ¼ inch. Avoid beads if the ornaments will be handled by children under three or accessible to pets. Embroidered dots provide the same color without detachable parts.
Make a secure hanging loop
Cut three 8-inch lengths of ribbon or cord. Fold each in half, align the cut ends, and tie them together with a compact overhand knot. Place the knot between the two felt layers at the top center, leaving a loop about 3 inches long outside. Pin through both felt layers and the ribbon just below the knot.
The knot should sit at least ½ inch inside the ornament. Simply stitching across two loose ribbon ends can allow the loop to pull free after repeated use.
Blanket-stitch the edges
Thread the needle with three strands of floss in a contrasting or matching color and tie a knot. Hide the starting knot between the felt layers. Bring the needle out ⅛ inch from the edge, then work blanket stitches approximately ⅛ inch deep and ⅛ inch apart. Consistency matters more than tiny stitches.
Sew around the shape, passing through the ribbon near the top with two extra stitches. Leave a 1½-inch opening along a straight or gently curved edge. Do not place the opening at a star point or the top of the tree, where closing stitches are difficult to space.
For sharp inside corners, such as between tree branches, place one stitch directly in the corner before changing direction. At star points, make two stitches share the same outer point. This keeps the outline crisp without pulling the felt out of shape.
Stuff without distorting the shape
Pull off small wisps of fiberfill rather than inserting one large wad. Use the blunt end of a pencil or a wooden skewer to guide filling into star points and the tree top, taking care not to puncture the felt. Fill the center last.
The ornament should feel softly padded, not firm. Overstuffing spreads the blanket stitches and rounds sharp edges. Viewed from the side, a finished 3½-inch ornament generally needs only ¼–⅜ inch of loft—roughly a loose tablespoon of fiberfill, depending on the shape.
Continue blanket stitching across the opening. Before the final stitch, redistribute any lumps with your fingers. Tie off by passing the needle between the layers, making a small knot close to the seam, and pulling the needle out 1 inch away. Snip the floss; the tail will retract inside.
Correct common problems
If the two layers drift while sewing, stop and repin them rather than trimming the edge repeatedly. A small mismatch can be evened after the seam is complete with very sharp scissors, but cutting too close may sever the floss. If a point refuses to fill, remove some center stuffing before adding a tiny wisp to the point.
Hang the finished ornaments on sturdy tree branches, gift packages, or cabinet knobs. Keep them away from candles and hot bulbs. After the season, wrap them in tissue and store them flat in a dry box; do not compress them under heavier decorations. A gentle pass with a lint roller will refresh the felt next year without pulling the embroidery.