
Start with a 2:1 flour-to-salt mixture, adjust the water gradually, roll it 1/4 inch thick, cut and personalize the shapes, dry slowly at 200°F, then paint and seal every surface.
Salt Dough Family Keepsake Ornaments
Salt dough ornaments need even thickness, slow drying, and sealing on every side. The quantities below are a starting batch that may yield about twelve 3-inch ornaments; actual yield and drying time depend on cutter shape, flour absorption, thickness, and oven behavior. Names, fingerprints, evergreen impressions, or the year can be added before drying.
Project at a glance
- Difficulty: Beginner
- Active time: 60–75 minutes
- Estimated total time: 4–5 hours including drying, cooling, and decorating
- Estimated yield: About twelve 3-inch ornaments
- Supervision: Adult oven, sanding, and sealer supervision; keep dough away from pets
Ingredients, tools, and timing
Measure 2 cups all-purpose flour, 1 cup fine table salt, and ¾ cup warm water. Keep another 2–4 tablespoons of water nearby, because flour absorbs moisture differently. You will need a mixing bowl, wooden spoon, rolling pin, parchment paper, two ¼-inch-thick wooden dowels or rolling guides, cookie cutters, a drinking straw, baking sheet, and fine sandpaper. For decoration, use acrylic craft paint, small brushes, matte water-based sealer, and 12-inch lengths of narrow ribbon or cotton cord.
Allow 30–45 minutes to mix and cut the ornaments, 2–3 hours for low-temperature baking, and at least an hour for cooling and decorating. The project is beginner-friendly, but an adult should handle the oven, sanding, and sealer.
Salt dough is not edible. The ASPCA Animal Poison Control Center warns that its salt can cause dangerous sodium levels in pets, including vomiting, excessive thirst, and seizures. Keep raw dough and finished ornaments out of reach of dogs and cats; if a pet eats any, contact a veterinarian or animal poison-control service promptly.
Mix a smooth, firm dough
Whisk the flour and salt together so the salt is evenly distributed. Add ¾ cup warm water gradually while stirring. When shaggy clumps form, knead the mixture in the bowl, then on an unfloured surface, for 5–7 minutes. The finished dough should feel smooth and firm, like modeling clay, without sticking to your hands.
If it crumbles when folded, knead in water 1 teaspoon at a time. If it feels tacky, add flour 1 tablespoon at a time. Avoid adding a large correction at once: overly wet dough spreads, while overly dry dough cracks around the edges.
Roll, cut, and personalize
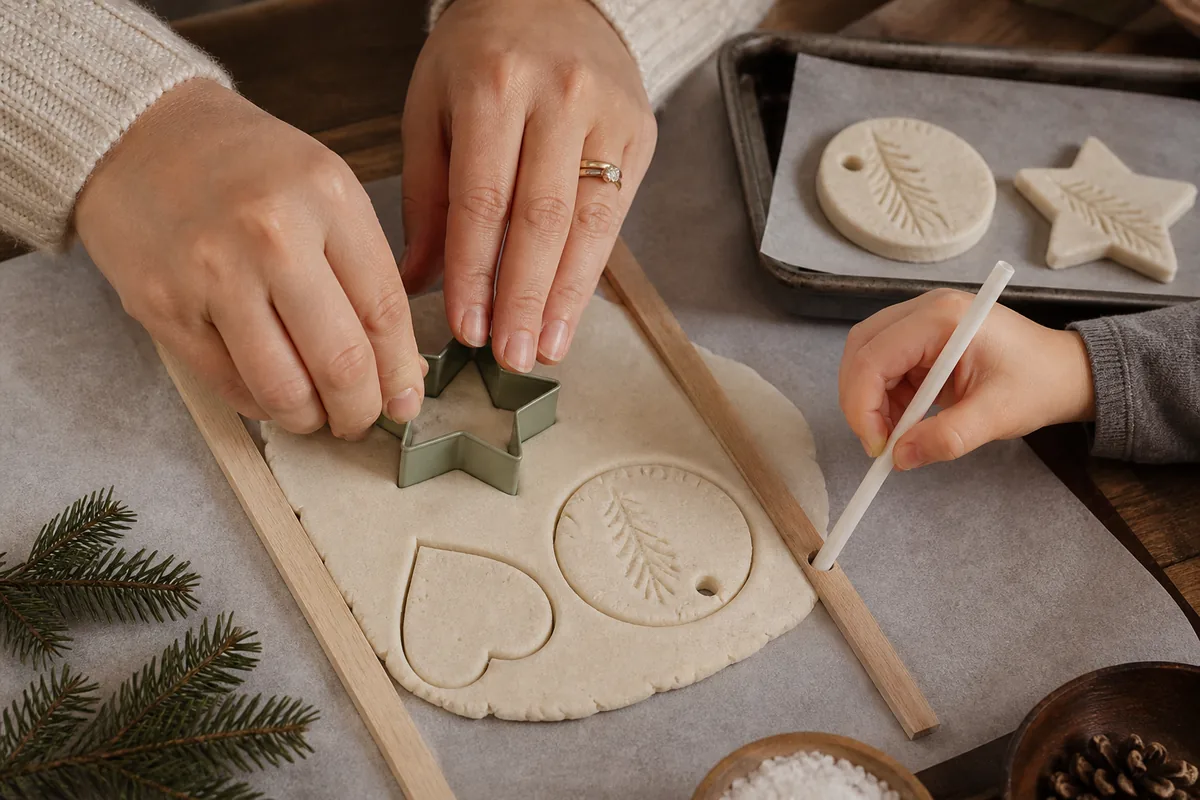
Heat the oven to 200°F. Place half the dough between two sheets of parchment, with the ¼-inch guides on either side. Roll until the pin rests on both guides. Consistent thickness matters more than perfect shapes; thin areas brown early and thick areas may remain damp.
Cut shapes 2½–3½ inches wide and transfer them to a parchment-lined baking sheet. Leave ½ inch between pieces. Press fingerprints gently rather than pushing through the dough. For botanical impressions, lay a clean, dry evergreen tip or rosemary sprig on the surface, roll once with light pressure, and lift it straight up. Add names or the year with small alphabet stamps or a blunt skewer.
Use a straw to cut a hanging hole at least ¼ inch from the top edge. A hole placed too close to the edge is likely to break when ribbon is tied. Gather scraps, knead only until joined, and reroll once; repeated rerolling makes the ornaments rough and dry.
Dry the ornaments without puffing
Use the center rack and begin checking after 2 hours, turning the pieces after about 90 minutes. Treat 2–3 hours as a planning range, not a guarantee. The surfaces should be pale and hard and the centers should no longer yield to gentle pressure; thicker or larger shapes may need additional 30-minute intervals. Keep the oven low—higher heat can create bubbles, browned edges, and curled ornaments.
Turn off the oven, crack the door, and let the tray cool for 30 minutes before moving it to a rack. Cool completely. If the back still feels cool or slightly soft, return the ornaments to a 200°F oven for 30-minute intervals. Moisture trapped under paint or sealer can later cause soft spots.
Paint, seal, and finish
Smooth sharp edges with fine sandpaper and wipe away dust. Leave part of the natural dough visible for a quieter vintage look, or use thin coats of muted red, evergreen, dusty blue, and warm ivory acrylic paint. Let each coat dry before adding names or fine lines. Do not paint inside a fingerprint impression so its texture remains clear.
When the paint is fully dry, brush on two thin coats of matte water-based sealer, covering the front, back, edges, and hanging hole. Dry according to the product label between coats. Sealing all surfaces slows moisture absorption; one heavy coat tends to pool in stamped details.
Thread a 12-inch ribbon through each hole and tie the ends with an overhand knot. Before hanging, pull gently on the loop to test the opening. Display the ornaments on sturdy inner branches rather than fragile branch tips.
Storage and common fixes
Wrap each ornament in acid-free tissue and store it in a rigid box in a cool, dry interior closet. Avoid attics, basements, and garages, where humidity and temperature swings can soften salt dough. If an ornament develops a hairline crack before painting, fill it with a small amount of fresh dough and dry it again. Once a finished ornament breaks through the hanging hole, use it as a gift tag or tabletop keepsake instead of trusting a glued repair on the tree.
Method and source boundary
This is source-based editorial guidance, not a record of a HollyXmas-controlled recipe test. Batch yield, water adjustment, and drying time are therefore starting estimates that readers should verify with their own ingredients, cutter, and oven. The safety warning is supported by the ASPCA Animal Poison Control Center; product labels remain controlling for paints and sealers.